tamagotchi flash drive
a tiny pet that reacts to the files you give him.
 cova

Download the code and animation files on GitHub.
What You Need
Hardware:
- Raspberry Pi Pico
- ST7735 LCD screen (128x128)
- USB cable
- Jumper wires
- USB A Flash drive
- JESSINIE XL334P4 USB-C Hub
Software:
- Thonny IDE (for uploading code to Pico)
- Python 3 (for running the watcher)
Setup Instructions
Step 0: Wire Up the Hardware
Connect your ST7735 LCD screen to the Pico:
| LCD Pin | Pico Pin | Purpose |
|---|---|---|
| VCC | 3.3V | Power |
| GND | GND | Ground |
| SCK | GP18 | SPI Clock |
| MOSI | GP19 | SPI Data |
| CS | GP22 | Chip Select |
| RST | GP21 | Reset |
| DC | GP26 | Data/Command |
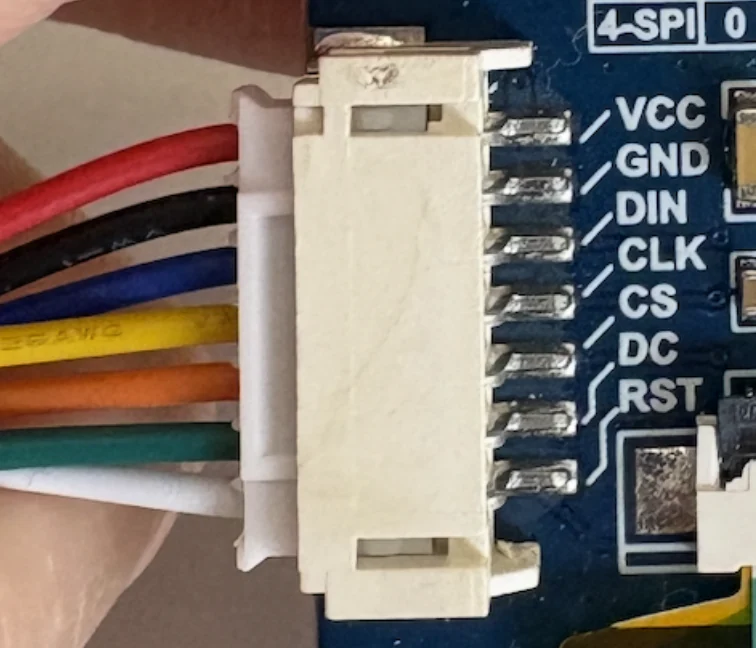
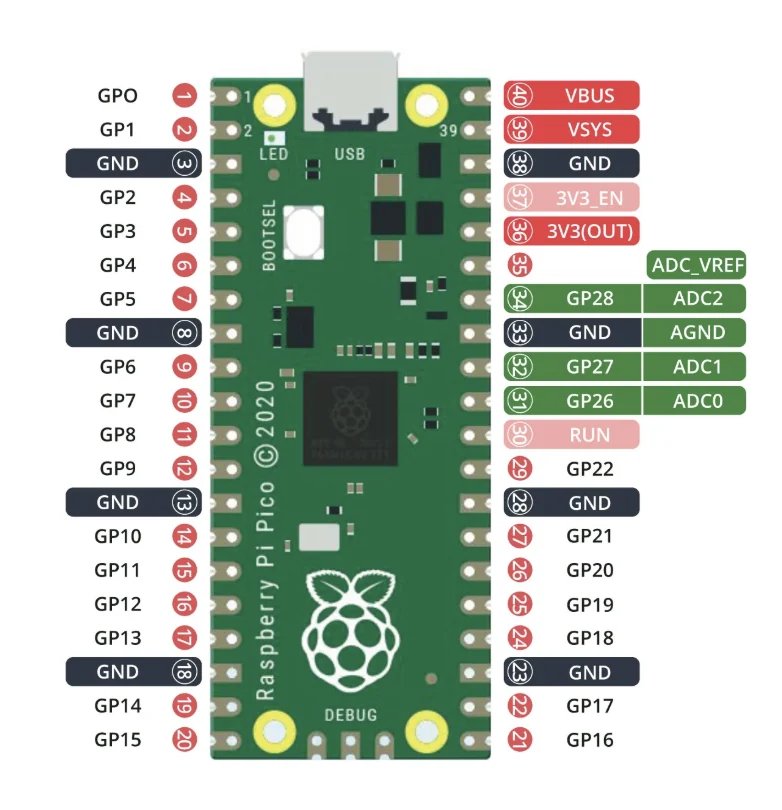
Tip: Double-check your connections before powering on. Wrong wiring can damage the screen.
Step 1: Install MicroPython on your Pico
- Download MicroPython from micropython.org
- Hold the BOOTSEL button on your Pico and plug it into your computer
- Drag the downloaded
.uf2file onto the Pico (it shows up as a USB drive) - The Pico will reboot automatically
Step 2: Upload Code to the Pico
- Open Thonny
- Connect your Pico via USB
- In Thonny, select your Pico: Run → Select Interpreter → MicroPython (Raspberry Pi Pico)
- Upload these files to the Pico:
main.py(main program)art/folder (all the animation files)
How to upload:
- Right-click each file → "Upload to /"
- For the art folder: create a folder called
arton the Pico, then upload all.binfiles into it
Step 3: Set Up the Watcher on Your Computer
- Connect the pico and USB drive to the USB breakout board, which you plug into your computer.
- Rename the flash drive (double click on Mac) to "hey im bit"
- Copy
watcher.pyto your Desktop (or anywhere on your computer) - Open Terminal
- Install the required package:
pip3 install pyserial
Step 4: Run the Watcher
- Make sure your Pico is plugged in
- In Terminal, navigate to where you saved
watcher.py:cd ~/Desktop - Run the watcher:
python3 watcher.py
Note: The watcher auto-detects your Pico's serial port. If it doesn't work, open watcher.py and change line 28 from:
PICO_PORT = "auto"to your specific port (e.g., "/dev/cu.usbmodem11201" on Mac or "COM3" on Windows)
How It Works
- When you add files to the drive, Bit gets fatter and happier
- When you delete files, Bit gets sad
- The watcher script monitors the drive and tells the Pico how to react via serial commands
States:
- 0 files = Hangry (sad loop)
- 1-9 files = Happy (normal loop)
- 10+ files = Chonk (fat and happy)
Troubleshooting
Pico not detected?
- Check the USB cable (some are power-only)
- Try a different USB port
- Restart Thonny and reconnect
Watcher not connecting?
- Make sure the Pico is plugged in and
main.pyis running - Check the serial port in
watcher.py(setPICO_PORTto your specific port) - On Mac:
ls /dev/cu.*to find your port
Animations not working?
- Make sure all
.binfiles are in theart/folder on the Pico - Check that the file names match exactly (case-sensitive)
Making the Case (Optional)
If you want to build your own custom case like the original:
- Design in Womp - Use Womp to CAD out your case design
- Add pegs and joints - Make sure parts fit together properly
- Order a 3D print or resin mold - Get your design printed (resin recommended for smooth finish)
- Personalize it - Add UV resin for an aquarium effect, or customize however you like
Credits
Built with love.